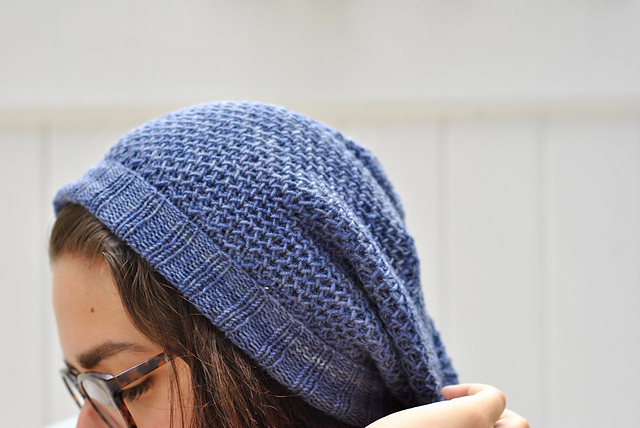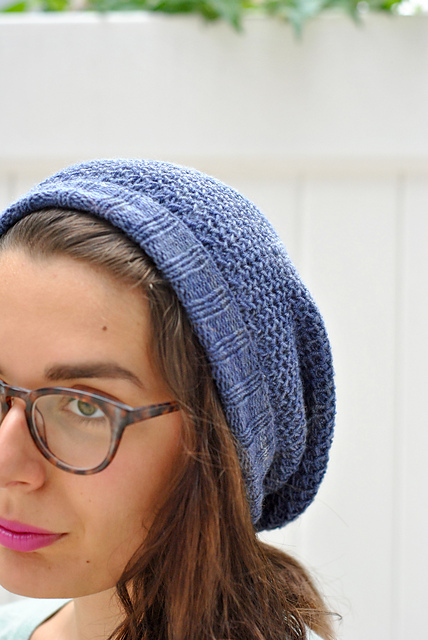
It’s no secret that I am absolutely, without a doubt, a Lord of the Rings fanatic. I own the books in multiple languages and recently got a Leaf of Lohrien tattoo (sorry mom!). The story and its lore inspires so much of my work and it was really just a matter of time before I created a knitting pattern dedicated to the Fellowship.
Mithril–the namesake of this project–is an elven metal that is lighter than a feather, but stronger than steel. Bilbo Baggins is gifted a shirt of Mithril armor in The Hobbit, and he passes it down to his nephew Frodo in the later trilogy.
Just like Mithril, this beanie is lightweight yet cozy. It’s made using the honeycomb stitch which is an awesome texture to add to your knitting repertoire. The free pattern starts just below. Let me know what you think and, as always, contact me with any and all questions!

THE PATTERN
Materials:
- 1 skein of Araucania Huasco Botany Lace in Indigo OR approximately 350 yards of any fingering weight yarn.
- #6/4.0mm circular needles
- #6/4.0mm double-pointed needles
- Stitch marker, measuring tape, scissors, needle
Abbreviations Used:
- k: knit
- p: purl
- k2og: knit two stitches together
- p2tog: purl two stitches together
- sl: slip stitch purl-wise
Casting On:
Using your circular needles, cast on 104 stitches. Place a stitch marker to denote the beginning of the round. Join your stitches for working in the round.
Ribbing:
k2, p2 across the row.
Repeat until ribbing measures 3″.
Body:
The body of the hat is worked using the Honeycomb Stitch. It can be a bit complicated and I recommend testing it out with some extra yarn first so you can get a feel for how the pattern works. Even if you’ve worked the Honeycomb Stitch flat before, working it in the round is slightly different. It goes like this:
Set-Up Round: [purl 1, slip 1 purlwise with yarn in front, yarn over], repeat brackets to end.
Round 1: [knit 2, slip yarn over purlwise with yarn in back], repeat brackets to end.
Round 2: [slip 1 purlwise with yarn in front, yarn over, purl 2 together], repeat brackets to end.
Round 3: [knit 1, slip yarn over purlwise with yarn in back, knit 1], repeat brackets to end.
Round 4: [purl 2 together, slip 1 purlwise with yarn in front, yarn over], repeat brackets to end.
Repeat rows 1-4 until the hat measures 8″ from your cast-on edge.
Crown:
The crown is worked in garter stitch. This is a bit annoying since we’re working in the round, but I promise it’s cool! Work your decreases as follows:
Round 1: [k13, k2tog] Repeat brackets to end of round.
Round 2 (and all even rows): P across to end of round.
Round 3: [k12, k2tog] Repeat brackets to end of round.
Round 5: [k11, k2tog] Repeat brackets to end of round.
Round 7: [k10, k2tog] Repeat brackets to end of round.
Round 9: [k9, k2tog] Repeat brackets to end of round.
Round 11: [k8, k2tog] Repeat brackets to end of round.
Round 13: [k7, k2tog] Repeat brackets to end of round.
Round 15: [k6, k2tog] Repeat brackets to end of round.
Round 17: [k5, k2tog] Repeat brackets to end of round.
Round 19: [k4, k2tog] Repeat brackets to end of round.
Round 21: [k3, k2tog] Repeat brackets to end of round.
Round 23: [k2, k2tog] Repeat brackets to end of round.
Round 25: [k1, k2tog] Repeat brackets to end of round.
Round 27: [k2tog] Repeat brackets to end of round.
Finishing:
You should have 16 stitches remaining on your needles. Cut your yarn and pull through the remaining stitches. Sew in ends.
For a slouchy look (as pictured) you’ll want to block. It really opens the honeycomb stitch and makes for a much looser fit. But you can leave it as is for a tighter, more close-fitting beanie.
Happy knitting!
xoxo
