• Free Pattern: Mithril Beanie

    DSC_0402_medium2

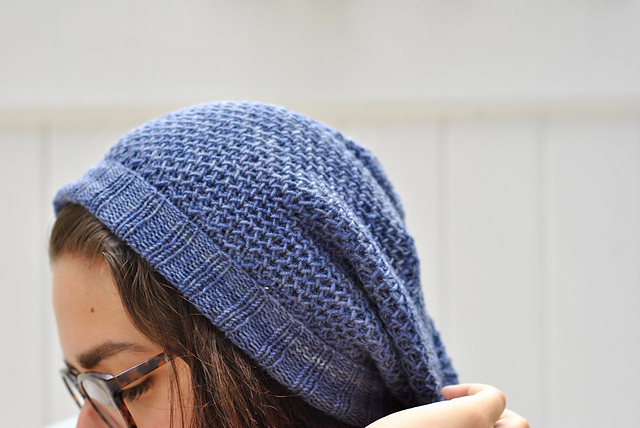
    It’s no secret that I am absolutely, without a doubt, a Lord of the Rings fanatic. I own the books in multiple languages and recently got a Leaf of Lohrien tattoo (sorry mom!). The story and its lore inspires so much of my work and it was really just a matter of time before I created a knitting pattern dedicated to the Fellowship.

    Mithril–the namesake of this project–is an elven metal that is lighter than a feather, but stronger than steel. Bilbo Baggins is gifted a shirt of Mithril armor in The Hobbit, and he passes it down to his nephew Frodo in the later trilogy.

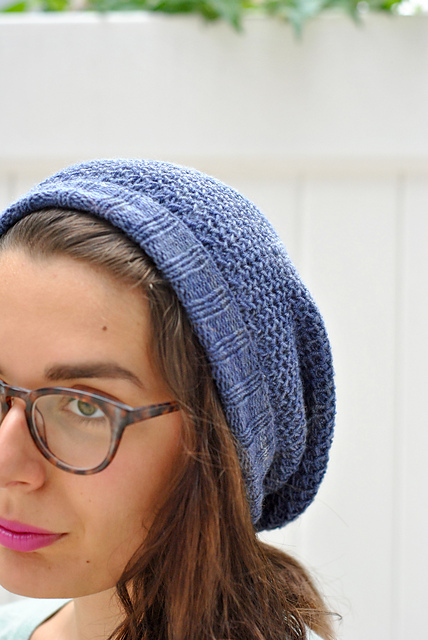
    Just like Mithril, this beanie is lightweight yet cozy. It’s made using the honeycomb stitch which is an awesome texture to add to your knitting repertoire. The free pattern starts just below. Let me know what you think and, as always, contact me with any and all questions!

    DSC_0405_medium2

    THE PATTERN

    Materials:

    • 1 skein of Araucania Huasco Botany Lace in Indigo OR approximately 350 yards of any fingering weight yarn.
    • #6/4.0mm circular needles
    • #6/4.0mm double-pointed needles
    • Stitch marker, measuring tape, scissors, needle

    Abbreviations Used:

    • k: knit
    • p: purl
    • k2og: knit two stitches together
    • p2tog: purl two stitches together
    • sl: slip stitch purl-wise

    Casting On:

    Using your circular needles, cast on 104 stitches. Place a stitch marker to denote the beginning of the round. Join your stitches for working in the round.

    Ribbing:

    k2, p2 across the row.

    Repeat until ribbing measures 3″.

    Body:

    The body of the hat is worked using the Honeycomb Stitch. It can be a bit complicated and I recommend testing it out with some extra yarn first so you can get a feel for how the pattern works. Even if you’ve worked the Honeycomb Stitch flat before, working it in the round is slightly different. It goes like this:

    Set-Up Round: [purl 1, slip 1 purlwise with yarn in front, yarn over], repeat brackets to end.

    Round 1: [knit 2, slip yarn over purlwise with yarn in back], repeat brackets to end.

    Round 2: [slip 1 purlwise with yarn in front, yarn over, purl 2 together], repeat brackets to end.

    Round 3: [knit 1, slip yarn over purlwise with yarn in back, knit 1], repeat brackets to end.

    Round 4: [purl 2 together, slip 1 purlwise with yarn in front, yarn over], repeat brackets to end.

    Repeat rows 1-4 until the hat measures 8″ from your cast-on edge. 

    Crown:

    The crown is worked in garter stitch. This is a bit annoying since we’re working in the round, but I promise it’s cool! Work your decreases as follows:

    Round 1: [k13, k2tog] Repeat brackets to end of round.

    Round 2 (and all even rows): P across to end of round.

    Round 3: [k12, k2tog] Repeat brackets to end of round.

    Round 5: [k11, k2tog] Repeat brackets to end of round.

    Round 7: [k10, k2tog] Repeat brackets to end of round.

    Round 9: [k9, k2tog] Repeat brackets to end of round.

    Round 11: [k8, k2tog] Repeat brackets to end of round.

    Round 13: [k7, k2tog] Repeat brackets to end of round.

    Round 15: [k6, k2tog] Repeat brackets to end of round.

    Round 17: [k5, k2tog] Repeat brackets to end of round.

    Round 19: [k4, k2tog] Repeat brackets to end of round.

    Round 21: [k3, k2tog] Repeat brackets to end of round.

    Round 23: [k2, k2tog] Repeat brackets to end of round.

    Round 25: [k1, k2tog] Repeat brackets to end of round.

    Round 27: [k2tog] Repeat brackets to end of round.

    Finishing:

    You should have 16 stitches remaining on your needles. Cut your yarn and pull through the remaining stitches. Sew in ends.

    For a slouchy look (as pictured) you’ll want to block. It really opens the honeycomb stitch and makes for a much looser fit. But you can leave it as is for a tighter, more close-fitting beanie.

    Happy knitting!

    xoxo

    DSC_0406_medium2


  • Recent Project Extravaganza!

    I’ve been on a serious knitting spree this summer. Kind of contradictory, I know–who wants to hold five pounds of wool in their lap on a 95 degree day? Still, this summer I’ve wrapped up tons of long-overdue projects and whipped up a couple of new ones. 

    From top to bottom: Bundled in Brioche by Stephen West, an original pattern I’ll be sharing soon!,  Viajante by Martina Behm, a random bastardized DROPS pattern I have never been able to find again, and Women’s Cardigan Style No. 150 from Free Vintage Knitting

    Currently on my needles: Ladies Classic Raglan Pullover by Jane Richmond in Cascade 220 (the color scheme is Neapolitan Ice Cream, of course), and a pair of rainbow socks in Manos del Uruguay fingering weight for my niece. 

    I’ll have more new patterns coming your way soon! 

    xoxo


  • Favorite Yarn: Araucania Huasco

    Image: earthfaire.com

    Oh yeah, this blog is about knitting too, right? Well let’s talk yarn!

    I’ve had a skein of Araucania Huasco Botany Lace sitting around in my stash for at least two years. As with any great skein, I bought it because it was just so damn pretty–a beautiful kettle-dyed mix of blues and greys. Yet, being a fingering weight, I have resisted using it because I either can’t decide on a project or don’t feel like self-inflicting carpal tunnel with #1 needles that day. 

    Finally, after completing a ginormous sweater for Rhinebeck (that can only be described as Bjorkian) I wanted to do something small-scale with a bit of intricacies. I pulled out my Araucania, some #4’s, and cast on for a hat. 

    I am literally addicted to knitting with this yarn right now–which doesn’t bode very well considering it’s finals week and I’d rather make a hat and watch Sailor Moon. The texture of the yarn is squishy, never stringy, and the variegation in color is oh-so subtle. The best part: the stitch consistently is really beautiful. I’m working the honeycomb stitch in the round and the results have been really even and lovely. 

    This would be a seriously rad yarn for a sweater or bigger project (if you have the patience…pshhhh). I can’t even imagine these colors on a large scale! The yarn is delicate and it’s advised to be dry-cleaned, so I wouldn’t suggest socks despite how good they would feel. I think scarves, shawls, hats, and other down the middle projects would be made really special with this yarn.

    Have you knit with Araucania before? I’d love to hear your thoughts!

    xoxo

    Shop Araucania Yarns at KnittingFever.com


  • New Pattern: Peach Slice Socks

    s1.jpg

    Peach Slice is a pair of squishy, stripe-y socks that are perfect for pairing with summer sandals. I made the leg slightly shorter than normal socks to give them a sportier look.

    The socks are knit from the top down, which can be a bit of a confusing method if you’ve never done it before. If you’re a first-time sock knitter, I would recommend the wonderful Susan B. Anderson tutorial “How I Make My Socks.

    Tosh Merino Light is a really fun yarn with just a hint of variegation and texture. One skein is a little more than enough for a pair of socks.

    The pattern is currently available for download on Ravelry! So head on over!

    xoxo,

    Hare & Anser

    ,

  • Free Pattern: Pussy Riot Ski Mask

    pussy_riot_1_medium2

    INTRO:

    For those of you unfamiliar, Pussy Riot is a Russian feminist performance artist collective/punk rock band. They’re known for performing when and wherever they want and railing against the Russian government. Two members of the group recently served 21 months in a gulag after being arrested during a performance. For lack of a better term, Pussy Riot goes hard as hell.

    I created this ski mask as a tribute to these awesome women. I hope you knit one and feel powerful and badass!

    MATERIALS:

    ·      Approx. 300 yards of any worsted weight yarn

    ·      Size #8 (5.0mm) circular needles

    ·      Size #8 (5.0mm) double-pointed needles

    ·      Stitch marker, measuring tape, scissors, needle

    ABBREVIATIONS USED:

    ·      k: knit

    ·      p: purl

    ·      k2tog: knit two stitches together

    THE PATTERN:

    Casting On:

    Cast 72 stitches onto size #8 circular needles. I used the long-tail cast on method for a nice even edge.

    Join your stitches to work in the round. Make sure your stitches aren’t twisted! Place a marker to indicate the start of the round.

    Neck:

    K1, P1 for 18 rounds.

    The piece should measure approx. 3.5” at this point.

    Head:

    Following the 18 rows of ribbing, knit 1 row of purl.

    Then, continue knitting in stockinette stitch for 4”. The entire piece should measure approx. 7.5” at this point.

    Eye Hole:

    To create the eye hole, you will briefly work back and forth before re-joining in the round to finish the crown of the head.

    Row 1: First, cast off 24 stitches at the beginning of the round. Then knit to the end of the row. Now, turn the work so the wrong side is facing you.

    Row 2: Purl

    Row 3: Knit

    Row 4: Purl

    Row 5: Knit

    Row 6: Purl

    Row 7: Begin the row by casting on 24 stitches. Then finish the row knitting as normal. When you reach the end of the row, join the work and resume working in the round.

    Crown:

    Stockinette stitch for 12 rounds. It’s a good idea to try on the ski mask at this point and assess the fit. Depending on how the eye hole sits, you may want to add or subtract a few rounds at this point.

    Begin decreases.

    Row 1: {k2tog, k4} Repeat to end of round

    Row 2: k

    Row 3: {k2tog, k3} Repeat to end of round

    Row 4: k

    Row 5: {k2tog, k2} Repeat to end of round

    Row 6: k

    Row 7: {k2tog, k} Repeat to end of round

    Row 8: k

    Row 9: {k2tog} Repeat to end of round

    Row 10: k

    Cut yarn and weave through remaining stitches. Pull to close.

    Eye Hole Band:

    Pick up and knit 60 stitches around the circumference of the eye hole. Knit in stockinette stitch for three rounds. Bind off in purl.

    Finishing:

    Weave in all ends and wear!

    pussy_riot2_medium2

    ,