
Before we get knitting today, we’ll need to learn the loop stitch. The loop stitch is a really, really cool technique that can be used to create a shag-like texture.
To show you how it’s done–I’ve made a quick video. So grab some needles and yarn and let’s get practicing!
That wasn’t so bad! I promise it’ll become complete second nature in no time.
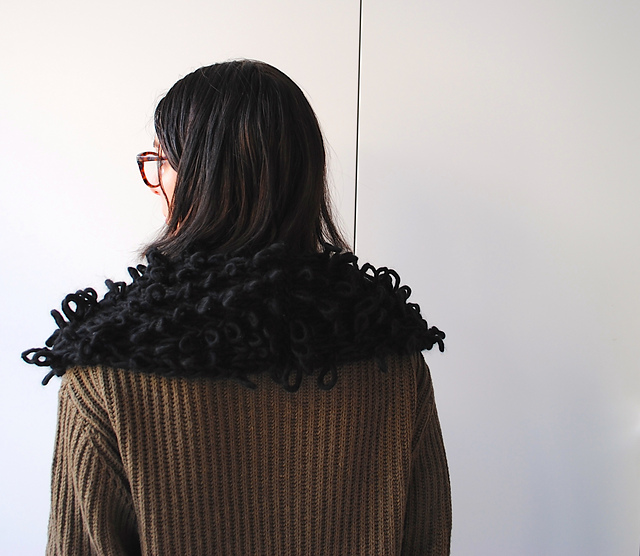
Now that we’ve mastered this rad technique, let’s try it out in a pattern: The Ygritte Shawl


The Ygritte Shawl is a collar, wrap, loopy, over the shoulder thing that is gonna look amazing worn over a band t-shirt, a leather jacket, a denim button down–whatever your fabulous heart desires. The pattern named after the fiercest Wildling babe from Game of Thrones. Even if you aren’t a fan–think of this as your knitted battle armor.
This shawl is worked in two separate pieces–a left and right side–and then seamed down the center back. You are welcome to try and work it in one piece–I just thought that making stitches while trying to make loops at the same time was guaranteed to get a bit messy!
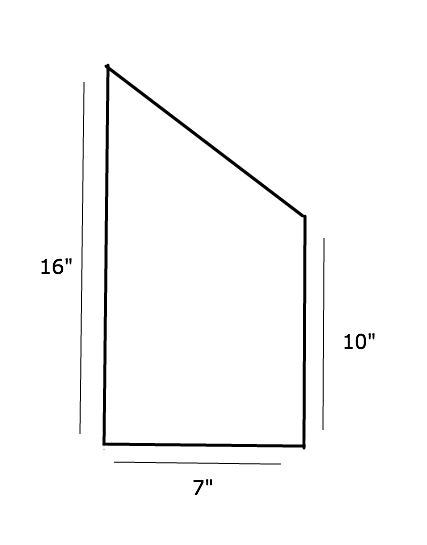
One last thing before we get started–here’s a diagram to guide you as to the shape of the pieces:
MATERIALS NEEDED
- 1 pair of size 19 (15mm) straight needles
- 1 skein of Purl Soho’s Super Soft Merino in Black, or approximately 87 yards of a comparable bulky yarn
- A sewing needle, scissors, measuring tape
ABBREVIATIONS USED
- k: knit
- p: purl
- slst: slip one stitch knitwise
- L: loop stitch
CASTING ON
Loosely cast on 15 stitches.
BODY
1(RS): slst, k, *(L, k) *repeat until there are two stitches left in the row, k2
2(WS): slst, k, p until there are two stitches left, k2
3: slst, k, *(k, L) *repeat until there are two stitches left, k2
4: slst, k, p until there are two stitches left, k2
Repeat these four rows, ending on a right side row, until your piece measures 10 inches.
As mentioned earlier, you are making two halves and then putting them together. The body is the same for both, so you will knit this section twice. You will then follow the instructions for “Decreasing – Left Side” for one piece “Decreasing – Right Side” for the other.
DECREASING – LEFT SIDE
Your next row should be a wrong side row. You will shape the shawl–aka make the decreases–on the wrong side rows. Right side rows will be knitted normally.
1(WS): slst, k, p2, p2, p until there are two stitches left, k2 (13 stitches remain)
2(RS): slst, k, *(L, k) *repeat until there are two stitches left, k2
3: slst, k, p2, p2, p2, p until there are two stitches left, k2 (10 stitches remain)
4: slst, k, *(k, L) *repeat until there are two stitches left, k2
5: Same as Row 3 (7 stitches remain)
6: Same as Row 2
7: sl st, k, p2, p1, pass p2 stitch over p1 stitch, k2 (5 stitches remain)
8: Same as Row 4
9: sl1, p2, p1, pass p2 stitch over p1 stitch, k1 (3 stitches remain)
10: Same as Row 2
11: (Three stitches left) p2, p1, pass p2 stitch over p1 stitch. Cut yarn and pull through to close the loop.
You are finished with the left side!
DECREASING – RIGHT SIDE
This side follows the same basic pattern as the left–the decreases just happen on the opposite side!
1(WS): slst, k, p7, p2, p2, k2 (13 stitches remain)
2(RS): slst, k, *(L, k) *repeat until there are two stitches left, k2
3: slst, k, p3, p2, p2, p2, k2 (10 stitches remain)
4: slst, k, *(k, L) *repeat until there are two stitches left, k2
5: slst, k, p2, p2, p2, k2 (7 stitches remain)
6: Same as Row 2
7: sl st, k, p2, p1, pass p2 stitch over p1 stitch, k2 (5 stitches remain)
8: Same as Row 4
9: sl1, p2, p1, pass p2 stitch over p1 stitch, k1 (3 stitches remain)
10: Same as Row 2
11: (Three stitches left) p2, p1, pass p2 stitch over p1 stitch. Cut yarn and pull through to close the loop.
You are finished with the right side!
ASSEMBLY
With yarn and thread, seam the two sides together at the cast-on edge.
FINISHING
Sew in all loose ends. If you choose to block, I recommend steam blocking under a towel. This texture is very sensitive!


Leave a comment